Numbers don’t lie. Sadly, every winter season tens of people die in the US by getting caught by an avalanche (avalanche.org).
In Europe that number is unfortunately even higher with approximately 100+ fatalities each year (avalanches.org).
In this article we will discuss some avalanche safety tips.
What is avalanche safety?
Avalanche safety is a set of guidelines and techniques for reducing the risk of being caught in an avalanche.
Awareness & risk perception
Avalanche safety should be everyones concern who goes into the backcountry during snow season.
Whether you are a freeride skier or snowboarder, mountaineer, hiker,… when you go into the backcountry you are exposed to avalanche danger.
For instance, freeriding has become more and more popular. This means that more people are going into the backcountry every year.
On the cool Youtube videos we see professional riders ripping the steep untouched faces. What we don’t see at home is the preparation that happens before riding these faces.
Sometimes these pro riders wait several years for the perfect (safe) snow conditions to finally go for that one descent.
Recreational skiers and snowboarders often don’t have the right knowledge and skills to assess avalanche danger in the mountains.
At most they have a look at the avalanche danger scale and think “it’s only a 2 or 3 out of 5 so it will be safe”.
Unfortunately, looking back at the statistics, 83% percent of avalanche fatalities happen on days with scale 2 or 3!
Adding to that, 90% of backcountry skiers or snowboards triggered the avalanche themselves.
The numbers speak for them selves. However, the risks involved with going into the backcountry can be lowered significantly with the right knowledge, awareness and decision making.
Research has shown that if people just get to know the basics about avalanche safety, they will start to think differently and more conservative towards riding uncertain terrain in the backcountry.
The results provide preliminary evidence that avalanche education may impact risk perceptions and provide useful hands-on skills for winter backcountry recreationists.
K. Green, J. Hendrikx and J.D. Johnson
With just some basic knowledge you will make smarter decisions in terms of where to ride based on the conditions.
This can already lower the risks drastically.
However, an introduction to avalanche safety will not make you an expert who can assess avalanche dangerous terrain in the backcountry.
The goal is not to scare you. Because the most important thing is to have fun in the mountains. But with the right mindset, knowledge and gear you can do it safely!
This article’s primary goal is to get you thinking and make you aware of the dangers. And hopefully you will delve into avalanche safety some more.
Avalanche safety tips: key ingredients
Let’s look at some of the basics in avalanche safety.
Always remember there are 3 key ingredients for an avalanche: a bound layer, a weak layer and a slope.
Let us look at an example: it’s been a month ago since last snow fall in the resort where we are staying. But today it started snowing and 30 cm fresh pow fell from the sky. The fresh snow will form a bound layer on top of the old one.
On the other hand, the fresh snow fell on an old layer from a month before. It can take some time until the new layer bounds with the old layer. Until that happens we speak of a weak layer between the old and new layer.
An avalanche is snow that is sliding down from the mountain. So, obviously you need a slope with sufficient angle of inclination for gravity to do its work.
In most cases, avalanches are possible from 30° angle of inclination and above. This is equivalent to the angle of inclination of a “black” labeled slope in Europe.
And there you have it… the 3 basic ingredients for an avalanche. Take one of these 3 out of the equation and there is no avalanche.
Different kinds of avalanches
There are different kind of avalanches which occur under certain conditions and circumstances. The most important ones are:
- Slab Avalanche: A dense layer of snow breaks off and slides down a slope. This is the most dangerous one for backcountry recreationists.
- Wet Avalanche: A type of avalanche that occurs when the snow is wet and heavy.
- Dry Loose Snow Avalanche: Loose, dry snow tumbles down the slope in a cascade of snow.
- Glide Avalanche: A slow-moving avalanche that occurs when a layer of snow on a slope begins to move without breaking apart.
Avalanche safety tips: danger scale

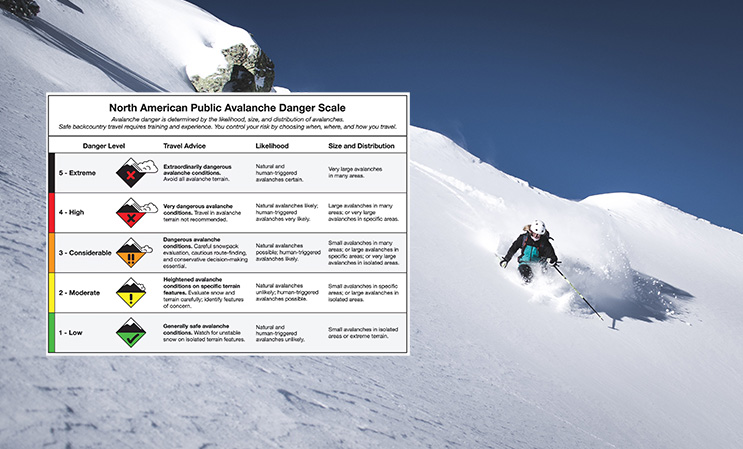
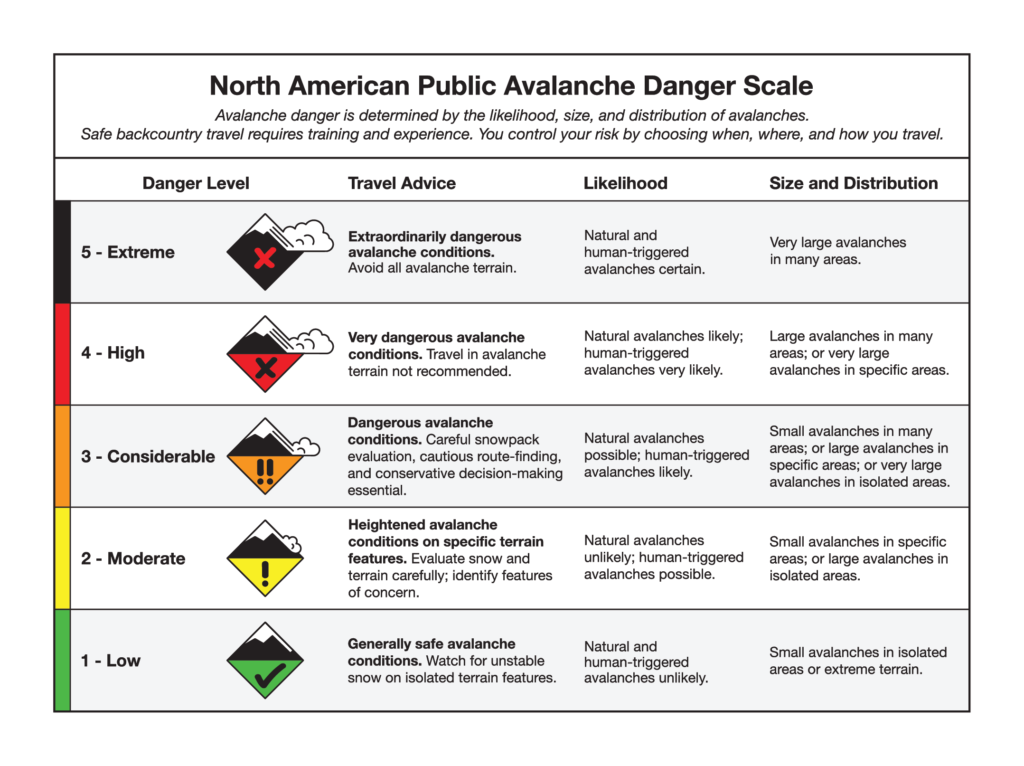
Avalanche danger scale is a way to communicate the likelihood and potential size of avalanches in a specific area.
The levels are determined by local avalanche centers or organizations and are based on various factors such as snow stability, weather conditions, and slope aspect.
The most commonly used danger scale system is the North American Avalanche Danger Scale, which has five levels:
- Low: Natural avalanches unlikely; human-triggered avalanches possible.
- Moderate: Natural avalanches unlikely; human-triggered avalanches possible on specific terrain.
- Considerable: Natural avalanches possible; human-triggered avalanches likely on specific terrain.
- High: Natural avalanches likely; human-triggered avalanches very likely on a wide range of terrain.
- Extreme: Widespread natural avalanches likely; human-triggered avalanches highly likely even on low-angle slopes.
Above we’ve already talked about the misperception of this scale. Most fatalities happen when danger levels are 2 or 3.
Most of the people don’t know that this scale is not linear but exponential!
Going from level 2 to 3 may seem like no big deal. But in reality, the danger level has doubled!
It is important to check the local avalanche forecast and to understand the danger scale system before engaging in winter backcountry activities like skiing or snowboarding in or near avalanche terrain.
In addition, the avalanche will give you more info about where specific problems in the snow pack are situated.
How to approach the mountain to find safe faces?
So far, we’ve talked about some basic concept involving avalanches. Now let’s look into some avalanche safety tips and which methods are available to safely ride in the backcountry.
Spread your decisions over time
The first blow is half the battle. The evening before you should start making plans for what to ride the next day. Take factors into account like the weather (check forecasts), snow (avalanche reports), terrain, gear and human.
Yess, that’s right… human! Think of your skill level, group pressure, responsibilities, etc…
Take all those factors in to consideration to develop your game plan for the next day. Eliminate the dangerous slopes or faces under those conditions.
Repeat this proces the next morning before you head to the mountain. Weather reports maybe have changed by now.
Or the avalanche report for today says something else then you’d expected.
Take all the updated data into consideration and check wether you should adjust your plans for the day or not. Eliminate more faces if necessary.
The last check you need to do is on the mountain it self. With visual inspection you can spot extra potential dangers on the mountain.
Maybe you will have to adjust your strategy, choose an other route or decide that it is unsafe to ride the face today.
The avalanche safety assessment methods below can help with making that call.
Avalanche safety assessment methods
Werner Munter method
The Werner Munter method is a simple and effective method used by skiers and snowboarders to assess the stability of a slope before riding it. It is named after the Swiss ski instructor Werner Munter, who developed the method in the 1990s. The method consists of the following steps:
- Determine the slope angle: The angle of the slope is the most important factor in determining its stability. A slope that is too steep is more likely to avalanche, while a slope that is too flat is less likely to present any danger.
- Evaluate the aspect: The aspect, or direction, of the slope also affects its stability.
- Assess the snow cover: The quality and distribution of the snow cover also affects the stability of a slope. Pay attention to the type of snow, such as whether it is powder or hard-packed, and how well it is bonded to the slope.
- Consider the weather conditions: The weather, including temperature, wind, and precipitation, can also impact the stability of a slope. A sudden warming or heavy precipitation can weaken the snowpack and increase the risk of avalanches.
Based on these four factors, the Werner Munter method can help you make a quick and informed decision about whether or not it is safe to ride a specific slope. However, it is important to remember that avalanches can be unpredictable and that no method can guarantee complete safety.
The stop or go method
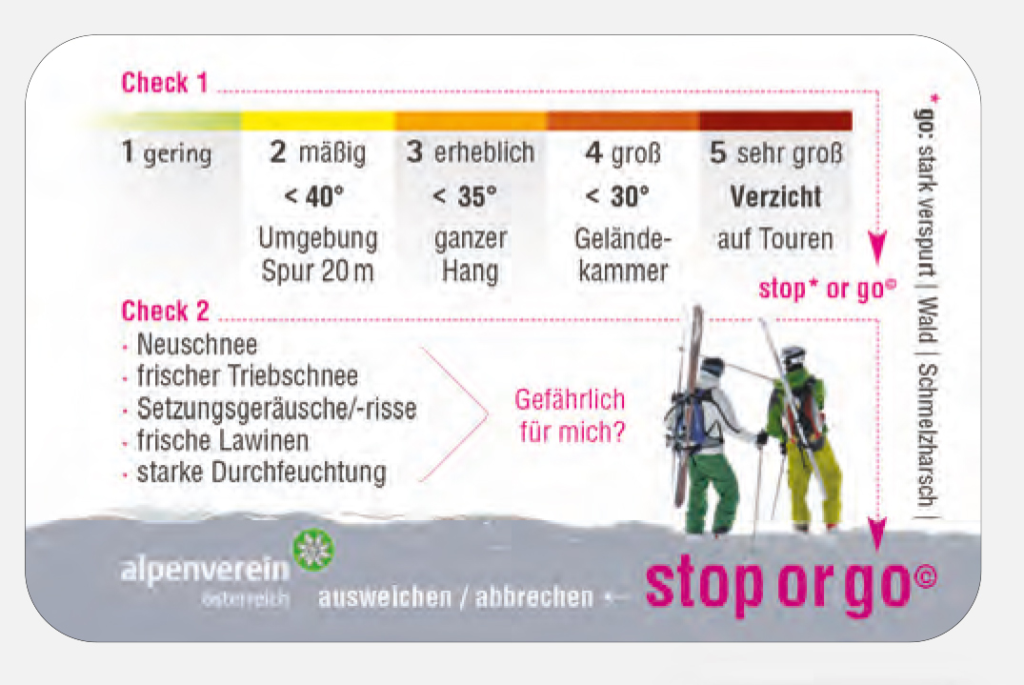
The basics of Werner Munter were further simplified by the Austrian Alpine club (Alpenverein) to make assessments easier.
The essentials are written down on a small card that you can carry with you easily.

It gives you an idea of what slopes are safe to ride based on the avalanche danger scale and angle inclination of the slope.
You can even use the card to estimate the angle inclination of the slope. However, tools like Fatmap can tell you that as well. It is highly advisable to use this kind of tool (or alpine maps) to plan your trip.
Avalanche safety gear
Finally, having the right avalanche safety gear is a must. The 3 mandatory tools are an avalanche transceiver, a probe and a shovel.
We’ll dive in a little deeper on that in a next article.
Hopefully, by reading this article you’ve been triggered to invest some time in building your avalanche safety knowledge further.
Follow a theoretical course or read a book about avalanche safety and then practice that knowledge with professional trainers in the backcountry.
If you have any questions feel free to ask them in a comment below this article.
Stay safe but remember to have fun!
Featured image by: Alex Lange